 vLite is the nLite Vista program presented here.
The other day I showed you how to create a Windows XP unattended installation CD using a program called nLite. Today I would like to show you how to create an unattended installation CD for Windows Vista using a program called vLite. This unattended installation CD works the same way as the one for Windows XP and allows you to automate the whole process of installing Windows, drivers, updates, as well as configuring Windows just the way you like it.
For this tutorial, you will need a Windows Vista installation DVD and a product key if you don’t want to be prompted to enter one during the installation. You will also need a blank CD or DVD if you would like to burn your unattended installation when you are finished.
Step 1: Download and install vLite. When you are finished run the program.
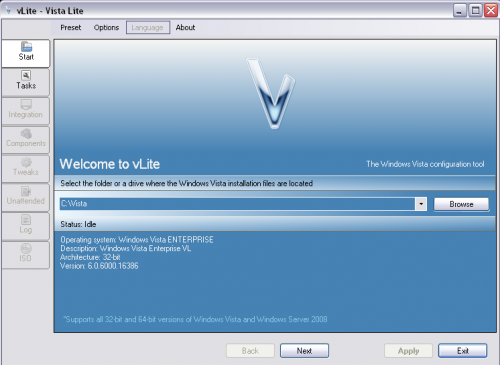
Step 2: You will be asked to locate your Windows Vista installation files. Click “Browse” and choose your Windows Vista installation DVD. You will then be asked where you would like to save your Windows Vista installation files. Create a new folder, name it whatever you like, and click “OK”. vLite will now begin to copy the installation files from the DVD to the folder you created. When it is finished, click “Next”.
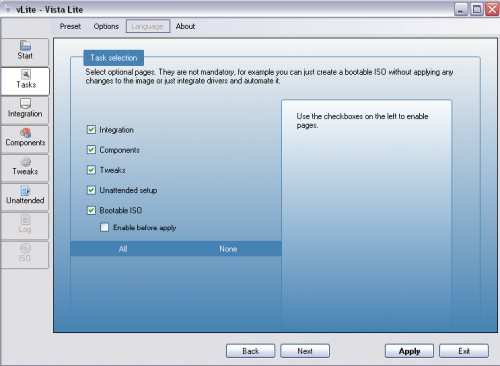
Step 3: Here you will be able to select which options you would like to configure. Click “All” and then click “Next”.
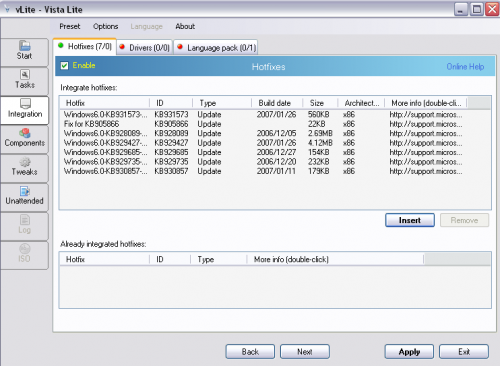
Step 4: Here you will be able to add all of the needed Windows updates to your unattended installation so you don’t have to install them later. Before you can add them, you will need to download the updates manually and save them to your computer. The easiest way to do this is by using Windows Updates Downloader. Once they are downloaded, click “Insert” and select them all. You can also set specific drivers to install when Windows installs by clicking on the “Drivers” tab and adding them. You can do the same thing with language packs by clicking on the “Language Pack” tab. When you are finished, click “Next”.
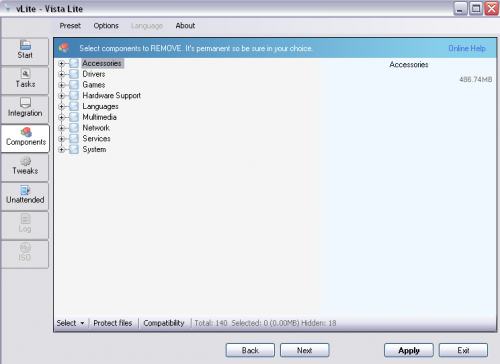
Step 5: Next you will be able to remove components that you don’t want installed during the installation process. When you are finished click “Next”.
Step 6: Here you will be able to tweak some additional security, system, and explorer settings. When you are finished click “Next”.

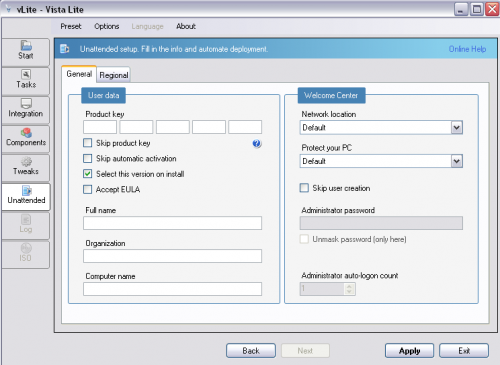
Step 7: Now you will be able to configure the unattended installation settings. If you have a product key, enter it in so you aren’t prompted for it later. When you are finished, click “Apply”.
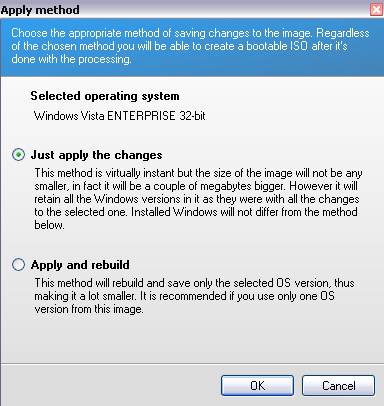
Step 8: You will be prompted with a window asking you to choose an apply method. The “Just Apply The Changes” radio button will be clicked by default which is fine. The “Apply And Rebuild” method takes a lot longer but saves you more space. Don’t use this setting if your image contains more than one version of Vista. Click “OK” and vLite will now begin building your unattended Windows installation.
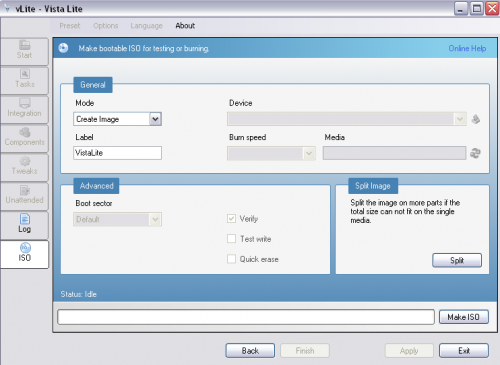
Step 9: You will now be able to burn your unattended Windows installation to a CD or DVD. You can also create an ISO file that you can burn later.
You are now ready to install Vista using your unattended installation CD. If you have any experience with vlite or unattended Windows installations, please feel free to post comments.

26 Comments
Anonymous
January 13, 2008Can you upgrade with this automated instilation?
Casey
January 14, 2008I haven’t tried an upgrade using vLite yet but my understanding is that it should work.
Anonymous
April 9, 2008Is there a way to change the user folder from C: to a different partition. It could be done in XP unattended install.
Anonymous
May 30, 2008havent tested it yet, but i am supposebly trying to make FULLY automated unattended cd for my client.
What it should o is basicly when you insert the dvd onto a drive upon reboot, it would basicly automatically repartition the partition wiping all data, create a partition of 50 gigs, and do a partition that is the size of the rest of the drive. If not secondary partition table is unable to be done, it only makes a partition worth full partition.
the secondary partition would not maybe even be needed to be made, as vista can nowdays do it too easy.
But, can i set the size of the partition that the vista sets, and fully skip the first step of the installation, leaving my client with no choises to be made?
miri-2po2 hacker
August 29, 2008works fucking brilianty Works fucking brilliantly. Heres what to do
1) download
2) use magiciso to imgburn to burn at the slowest speed 1X or 2X
3) Set the BIOS to boot from CD
4) When it prompts for you to hit any key. Hit anykey
5) Now this is what made me burn this twice, it will have the mouse on a pretty coloured screen, IT HAS NOT FROZEN ITS JUST TAKING ITS TIME DO NOT EXIT.
6) After about 5-6minutes or more of no responce, it will come up with the instalation options.
7) install and be happy with this amazingly fast vista (never thought i would say that) ^_^
ps, this is in english only, but it has differnent keyboard options. You can get more language packs via the windows update. any problem email me
Stephen
December 24, 2008When I open vLite I get a message to install WIM Filter and that it requires WIM API too. I downloaded and installed WAIK as it suggested but I keep getting the same message when I try to run vLite.
Any Suggestions?
Corey
December 26, 2008I had the same problem and the solution is:
find “wimgapi.dll” (it comes with the WAIK but doesnt install correctly in vlite)
copy it and paste it into the vlite program folder
if you cant find it, here it is
wimgapi.dll(rar) 144 KB:
[code]http://rapidshare.com/files/164836580/wimgapi.rar[/code]
you still need to install WAIK for this to work
Stephen
December 26, 2008Thanks for your reply. It finally occurred to me what to do while I was doing something else so now it is working.
Thanks for you help. Happy New Year!
moe
April 8, 2009thank you so much, i was stuck at this stage for like 2 days now trying to figure out what i was doing wrong.
abhi
March 14, 2009Hi,
Thanks for valuable information. Is it possible to load my HD drivers in the vista installation? I used vlite for adding [Sorry link removed due to secutiy issues during change over to secure site – Ed] is specific driver to read my HD. But after burning modified iso with above driver I have same problem. Is there in way I can load this driver at the beginning of all drivers.
My problem is I’m installing Vista on my HP dv2915nr notebook which requires HP driver loaded to enable HD read/write.
I was able to install XP as it prompts me to press F6 to load drivers. but in vista installation I do not get such menu to force load my drivers.
Many Thanks,
Abhijit
Daniel
May 20, 2009Hi,
thanks for the tutorial anyway. I’ve done build my own vista ultimate with some reduced components and it worked on my PC.
But, my question is, everytime i connect any hardware into my PC via USB (eg. UFD, USB Harddrive), vista can not find the driver automatically & it is different from installing vista without vLite.
does anyone have any idea how to overcome my problem??? i bet anybody have.
thanks anyway, and i appreciate for helping me or anybody who has the same problem.
Daniel
zzzz
May 30, 2009This tutorial is suck
banana.beach
June 19, 2009Thanks a lot for this great guide.
Fuad
November 10, 2009I am asked to download and install “WAIK”. It is huge program, about 1.3 GB! Is it necessary to download this? if not, what is the alternative?
Please help!
Thank you in advance,
Casey
November 10, 2009Hi Faud,
At what step are you being asked to download this?
leebo
November 11, 2009Hey Casey,
This is all the necessary W.A.I.K files for vlite to work , no need to download the entire W.A.I.K dvd. Just extract to your vlite install folder , then when asked to install filter just click install.
http://www.megaupload.com/?d=KHLGCI4D
Casey
November 21, 2009Thanks Leebo!
oelil
August 11, 2011hi leebo…this link is invalid…please reupload…I need that
thx
Fuad
November 11, 2009Casey,
I installed vLite. When I ran it, I was prompted to install WAIK. There were 2 options: Either, installing WAIK of exit the program!
Leebo,
I was stuck at that point when I am asked to download and install “WAIK”. Many thanks to you, you solved it. I do appreciate your effort 🙂
Thank you all. You are a good group.
rico
January 26, 2010hey, new to this website. does anyone have any problems loading it in Hp desk or laptop. my keyboard locks up or does a boot loop.
tell some suggestion to fix this hickup.
thanks
Dinesh
June 17, 2010Hi All,
The steps mentioned in this website for creating the unattended install is just awesome. But I am facing one problem for which I am looking for the answer. I am prompted with partition to be selected for installing the Vista. I have tried even setting the “” tag to true in the autounattend.xml file. But no success in overcoming the problem explained above.. Seeking any of your help to overcome this problem.
Thanks
Dinesh
cokke
December 9, 2010thank u for the WAIK link leebo…
tent
March 26, 2011thank you so much for the WAIK link leebo…
FullOS
July 17, 2011Tested, thank you very much!!!
Free File Sharing
August 25, 2011Thanks, I appreciate it!
Leave A Response